
If you extract groundwater for
your plant, you have probably heard that a flow meter alone is no longer
enough. Regulators want the readings sent automatically, without someone
walking out to copy numbers into a logbook. That is the job of an IoT
telemetry device for flow meters. The good news is that fitting one is a
lot less intimidating than it sounds. Here is how the process usually goes, in
plain language.
What an IoT Telemetry Device Does for Your Flow Meter
Think of the flow meter as the
part that measures, and the telemetry device as the part that reports. It reads
the flow data from the meter and sends it over a mobile network to a cloud
platform, where it can be viewed, stored, and shared. It works with electromagnetic
and ultrasonic flow meters, and for groundwater users it supports
CGWA-compliant remote reporting without manual data entry.
Before You Start: Check Your Flow Meter and Site Requirements
A little preparation saves a
lot of time on the day. Before installation, confirm a few things:
•
The flow meter is already installed correctly, powered,
and showing a stable reading
•
Which output your meter transmitter offers, such as
4-20 mA, isolated pulse output, or RS485 MODBUS
•
A reliable mobile signal at the meter location, or
somewhere nearby where an antenna can be placed
•
A safe, dry, protected spot for the device, away from
direct rain and heat
•
Access to a suitable power supply for the telemetry
unit
Exact wiring and settings differ between meter and device
models, so always keep the manufacturer's manual handy.
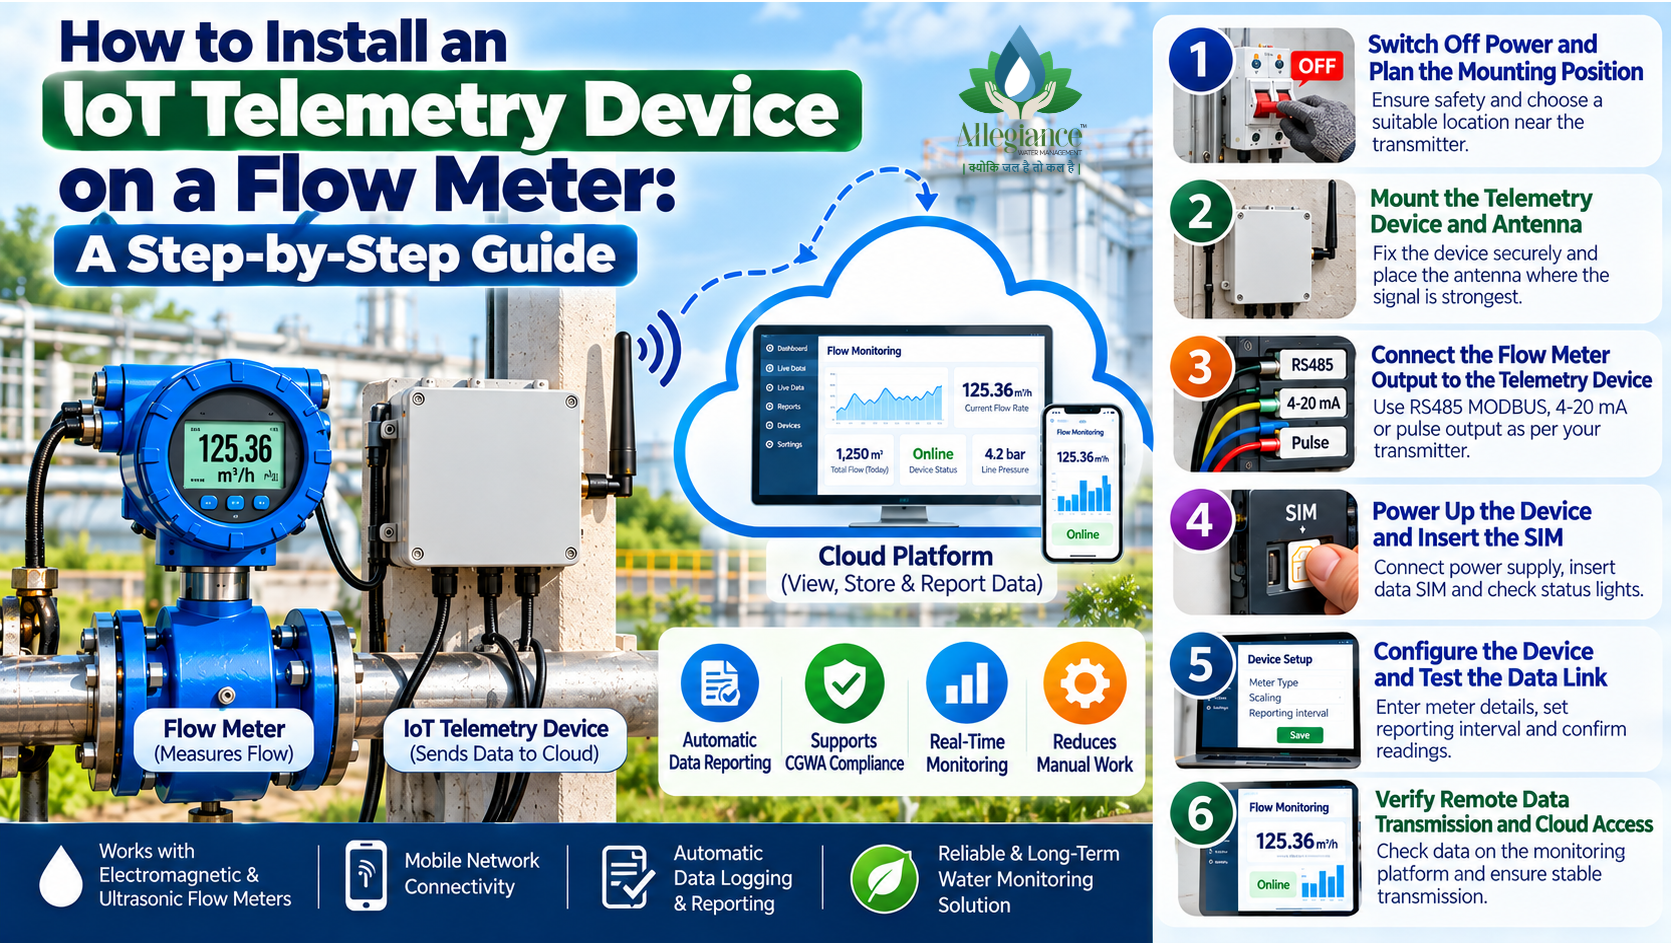
Step 1: Switch Off Power and Plan the Mounting Position
Safety comes first. Before
touching any wiring, switch off the supply to the flow meter transmitter and
the area around it. Then pick a mounting position for the telemetry device. A
wall or panel close to the transmitter works best, because shorter cable runs
mean fewer signal problems and a tidier installation.
Step 2: Mount the Telemetry Device and Antenna
Fix the device securely in its
enclosure or panel. If it has an external antenna, place it where the signal is
strongest, usually higher up and away from large metal surfaces that can block
reception. A quick signal check with a phone at the spot is a simple way to
avoid disappointment later.
Step 3: Connect the Flow Meter Output to the Telemetry Device
This is the heart of the job.
The telemetry device needs to receive data from the meter, and which connection
you use depends on the output your transmitter provides. A digital link such as
RS485 MODBUS can carry detailed data, while a 4-20 mA signal or a pulse output
carries flow information in a simpler form. Match the connection to the
device's input terminals, use properly shielded cable, and double-check
polarity before going further.
Step 4: Power Up the Device and Insert the SIM or Connectivity Module
Once the wiring is checked,
connect the telemetry device's power supply and insert the data SIM or enable
the connectivity module as the device requires. Switch everything back on and
watch for the status lights, which normally show whether the device is powered,
connected to the network, and reading the meter.
Step 5: Configure the Device and Test the Data Link
Now the device needs to know
what it is reading. Enter the meter details, scaling, and reporting interval as
per the device setup, then confirm the readings on the device match what the
flow meter display shows. Compare a few readings side by side. If the numbers
match and the cloud dashboard is receiving data, the hard part is done.
Step 6: Verify Remote Data Transmission and Cloud Access
Log in to the monitoring
platform and check that the flow data is arriving on time and showing
correctly. Leave the system running for a few hours, ideally through a change
in flow, to make sure transmission stays stable. This is also a good moment to
set up user access for the people who need to see the data, such as the plant
manager and your compliance team.
Common Installation Mistakes to Avoid
•
Mounting the device in a spot with weak mobile signal
•
Using unshielded or poorly terminated cables that
introduce noise
•
Mixing up wiring polarity or choosing the wrong input
type
•
Skipping the side-by-side comparison of meter and
device readings
•
Leaving the unit exposed to rain, heat, or dust without
a proper enclosure
Keeping Your Telemetry Setup Running for CGWA Compliance
Installation is only the start.
For groundwater users, the real test is whether the data keeps flowing month
after month. Check the device periodically, keep the SIM active and the power
supply stable, and act quickly if the readings stop. A telemetry unit that
quietly stopped reporting is a common cause of compliance queries during
inspections and renewals.
Final Thoughts
Installing an IoT telemetry
device on a flow meter is a methodical job rather than a complicated one: check
the meter, mount the device, wire it, power it up, configure it, and test it.
Done carefully, it gives you reliable, automatic reporting and one less thing
to chase every month. If you would rather have it done properly the first time,
a trained installation team can handle the wiring, configuration, and testing
for you.
Contact Us
Phone: 9574198769
Email: info.allegianceindia@gmail.com
Website: www.allegianceindia.in